


Sunday, November 4, 2012
*click on image to view full-sized*
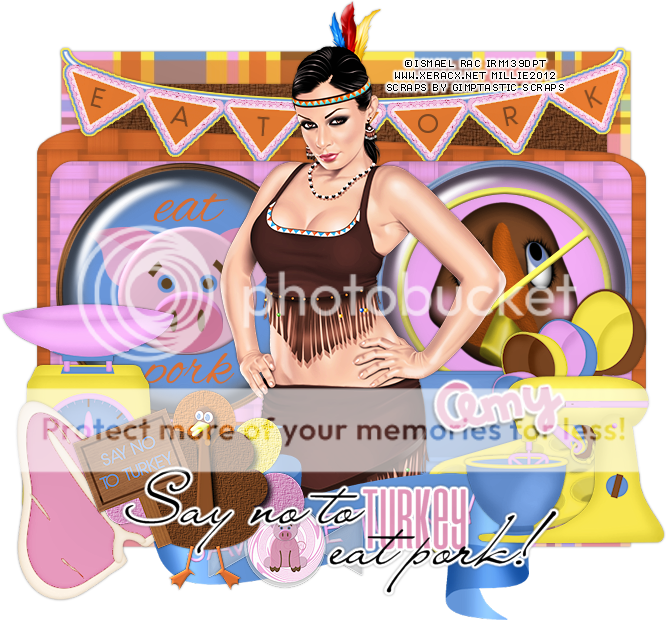
This tutorial was written by Millie on November 4, 2012.
Any similarity to any other is pure coincidence.
If you're doing this tutorial you have psp knowledge.
I used PSPX2 but any version should be ok.
PTU Pork Thanksgiving
Artist: Ismael Rac
Scrapkit: Turkey Day Protest by Gimptastic Scraps
Template: 114 by me HERE
Font: I used LD Buttercream
Plugins: eyecandy - gradient glow
Open your mask and minimize it in your workspace.
*drop shadow throughout 1 1 65 5 black*
Open Template 114 - Duplicate - Close original
Delete Raster 1 which is the CR layer
Go to layer 1 - selections - float - defloat - new layer
Open paper 5, c/p into selection, selections - none
Go to layer 2 - selections - float - defloat - new layer
Open paper 10, c/p into selection, selections - none
Go to layer 3 - selections - float - defloat - new layer
Open paper 7, c/p into selection, selections - none
Open banner, c/p as new layer
Place so is aligned with layer 1 at the top
Merge layer 5 down to 4
selections - float - defloat - new layer
Open paper 8, c/p into selection, selections - none
Merge layer 7 down to 6
Open Flair1, c/p as new layer
Place so is above the left circle
Open Flair2, c/p as new layer
Place so is above the right circle
c/p your tube as a new layer and place in the middle
Duplicate tube, change blend mode to soft light
Change opacity to 65
Open banner - resize by 65%, sharpen
c/p as new layer, place in center but by tube's legs
*see mine for placing or just put it where you like best*
Open muffin pan, resize by 50%, sharpen
c/p as new layer, move to the right of tag
Open pan, resize by 50%, sharpen
c/p as new layer, move to the right of tag
Open mixer, resize by 50%, sharpen
c/p as new layer, image - mirror, move to the right of tag
Open piggy candy, resize by 50%, sharpen
c/p as new layer, move to the right of tag
Open protest turkey1, resize by 50%, sharpen
c/p as new layer, move to the left of tag
OPen porkchop, resize by 80%, sharpen
c/p as new layer, move to left of tag and place under turkey
Open scale, resize by 60%, sharpen
c/p as new layer, move to the left, place under porkchop
Merge layer 9 down to 8
Effects - plugins - eyecandy - gradient glow
Settings: Basic tab 3, 25, 100. draw only outside selection checked
Color tab: Fat
Move to the middle of the tag
Add and remove any elements you want.
There are loads to play with.
When you are done, delete your background layer and merge visible
Add your credits and your name
Thank you for trying my tutorial :)
Subscribe to:
Post Comments
(Atom)


0 comments:
Post a Comment