


Monday, December 31, 2012

You can download HERE
Sunday, December 30, 2012

Friday, December 28, 2012


Mask 11
*click on image to save full-size*

Mask 12
Thank you for stopping by :)

Thursday, December 27, 2012

Here's another New Year's Template :)
Hope you like it and use it.
You can download it HERE
Thanks for stopping by!

*click on image to view full size*
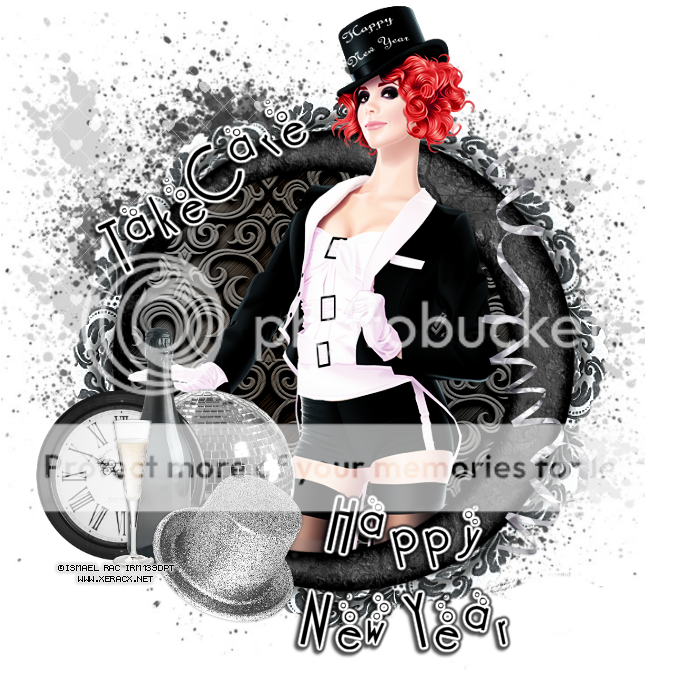
FTU The New Year Is Here
This tutorial was written by me on December 27, 2012.
It was made out of my own creation and any similarity is purely coincidental.
I used pspx2 but any version should work without problems.
Let's get started!
Artist: Arthur Crowe
Scrapkit: Happy New Year by Gimptastic Scraps
Plugins: Xero - Radiance
Font: Beautiful ES
File - new - 700x700 flood fill w white, rename background
Open frame 3, c/p as new layer
Open paper 6, c/p as new layer, place under frame layer
Open tube close up, c/p as new layer, place to the left
Click inside left square in frame, expand by 5, on tube layer, invert, delete, deselect
c/p tube close up as new layer, mirror, place to the right
Click inside right square in frame, expand by 5, on tube layer, invert, delete, deselect
Click inside both squares in the frame, go on paper layer, invert, delete, deselect
Merge tubes together, xero - radiance, change blend mode to luminance (L)
Add drop shadow to frame, close background, merge visible, open bckground back up
Open mask, resize by 50%, sharpenc/p as new layer, place to the top left of frame
Open feather2, resize by 80%, c/p as new layer, place to the left, duplicate, mirror
Open glitter ball, resize by 80%, sharpen, c/p as new layer, place to left, above background layer
Duplicate, mirror
With your text tool and Beautiful ES font, change background to any gold pattern
write "The new year is here", selections all, float, defloat, new layer
Move new layer under writing, expand by 2, flood fill w black, deselect
Merge gold down to black lettering and add drop shadow 2 -2 75 10 black
Crop your tag, delete background layer, merge visible, add credits and name
Thanks for trying my tutorial :)
Wednesday, December 26, 2012


Tuesday, December 25, 2012

*click on image to view full size*
FTU New Year's After Party
This tutorial was written by me on December 25, 2012.
It was made out of my own creation and any similarity is purely coincidental.
I used pspx2 but any version should work without problems.
Let's get started!
Artist: Tony Tzanoukakis
Scrapkit: 2013 After Party by Tasha's Playground
Template: #157 by me HERE
Plugins: xero - porcelain, clarify, fritilary, radiance
Font: I used Ambiance
*drop shadow of 1 -1 60 5 black throughout unless noted*
Open your template, duplicate, close original
Delete cr layer, go to background, make visible
canvas 800x800 flood fill w white
Go to layer 1, selections all, float, defloat
Open paper2, c/p as new layer, invert, delete, deselect
Add drop shadow to layer 2
Merge layer 4 down to layer 3
Open your tube, c/p as new layer, place to the right
Make sure the face fits inside circle, mirror, merge down
Click inside circles w magic wand, new layer
flood fill w a gradient (i used both pinks from template as my fg and bg)
on tube layer, invert, delete, invert
New layer, selections, modify, select selections borders
both sides, anti-atlas, width 2, hit ok, flood fill w light gray
Add noise, uniform, 100, deselect
Back on tube layer, xero - radiance, change blend to screen
Merge tube down to gradient, merge border down to tube
Open discoball, resize by 80%, sharpen, c/p as new layer
Go on layer 5, open ciyscape, resize by 80%, sharpen, c/p as new layer
Duplicate, change blend to screen on duplicate, change opacity to 68 on original
Go to background layer, open fireworks2, c/p as new layer, place to the left
Duplicate, mirror, merge down
Go to layer 6, selections all, float, defloat
Open paper5, c/p as new layer, invert, delete, deselect
Go to layer 7, selections all, float, defloat, new layer
flood fill w gradient, xero - fritilary w these settings
granularity 4, aggression 30, tesselation 82, variation 96, hit ok, deselect
Go to layer 8, c/p your tube as new layer, place down and to left
Face inside of square, duplicate, mirror, merge down
With magic wand click inside both squares in layer 8
On tube layer, invert, delete, deselect
xero - radiance, change blend mode to screen
Open frame1, c/p as new layer, with deform tool resize a little so its the same size as squares
Open bow, resize by 50%, sharpen, c/p as new layer, place to left
With deform tool, rotate down some, duplicate, mirror
Drop shadow on layer 9
Open party pass, resize by 50%, c/p as new layer, rotate to the left w deform tool
Open glitter spray, c/p as new layer, place to the bottom
Layer 10, eye candy - gradient glow, width 3, Fat, click ok
Open wordart, resize by 50%, sharpen, c/p as new layer, place to the right
Add gradient glow same as above
Open your tube, resize it to fit your tag
Effects, xero, porcelain - change blue channel to 0
Xero - clarity (default)
Crop your tag, delete your background layer, merge visible, resize to 700 on longest side
Add your credits and your name!
Thanks for trying my tutorial :)

Merry Christmas everyone who celebrates and Happy Holidays for the rest!
I hope you enjoy your time with your family and get everything that you want!
Here's a template for you guys for New Years and a tutorial coming soon after!
You can download it HERE
I'm going out of town for a week and have left scheduled goodies for you all.
There will be at least one post each day.
Make sure you stop by and grab them everyday if you like :)
Last but not least thank you all so much for the continued support!
I appreciate it so much that everyone keeps coming back for my stuff.
It really makes my day and keeps me wanting to make more!
Thank You from the bottom of my heart! xo
Monday, December 24, 2012


Saturday, December 22, 2012

*click on image to view full size*
PTU Blue For U
This tutorial was written by me on Dec 22, 2012
It was made out of my own creation and any similarity is purely coincidental.
I used pspx2 but any version should work without problems.
Let's get started!
Artist: Roman Zaric
Scrapkit: Blue In Blue by Stef's Scrapkits
Mask: WSL mask 17 HERE
Plugins: Flaming Pear - Trans Line
Font: Angelova
File - new - 700x700 - flood fill w white
Open ele43, resize by 75%, sharpen, c/p as new layer
Click inside frame w magic wand, expand by 5
Open paper 5, c/p as new layer, move under frame, invert, delete, deselect
On Frame layer - effects - flaming pear, trans line
Open ele09, resize by 50%, sharpen, c/p as new layer, place at top right
Open ele05, c/p as new layer
Open ele03, c/p as new layer, place to the left, duplicate, mirror
Open ele57, resize by 75%, sharpen, c/p as new layer
Place to the left of frame, duplicate, mirror
Open your tube, resize it to fit your tag, c/p as new layer
Duplicate, change blend to soft light, merge down
Open ele54, c/p as new layer, place so it covers tube's legs
Open ele21, c/p as new layer, place to the bottom
Open ele06, c/p as new layer, place on the bottom
Go to background layer, click inside it w magic wand, new layer
Open paper2, c/p into selection, deselect
Apply your mask - layers - new mask layer - from image
Find your mask in source window, hit ok, merge group
Duplicate your mask and change opacity to 60
Delete background and merge visible
Add your credits and then your name
Thanks for trying my tutorial :)
Friday, December 21, 2012

Audrey made yet another fabulous tutorial using my template #155.
It is called "New Year's Babe"
If you want to give this one a try then visit her blog HERE
Thank you so much Audrey for the awesome tag and for using my temp!

Jeannine made this cute New Year's Tutorial.
It's called Bringing In the New Year! using my temp 155
If you want to give it a try you can visit her blog HERE
Thanks so much Jeannine for my tag and for using my temp :)

Jean made this adorable Christmas tut using my template #132.
She also used on of my masks :)
It's called Spreading Christmas Cheer.
If you want to give her tutorial a try you can visit her blog HERE
Thank you so much for my lovely tag and for using my stuff! xo

My awesome friend Kimberly and me got together again to make some more templates!
We both posted the templates on our blog :)
Go and visit Scrap Rebellion and check out all her awesome freebies!
You can download them HERE
Thanks for stopping by :)
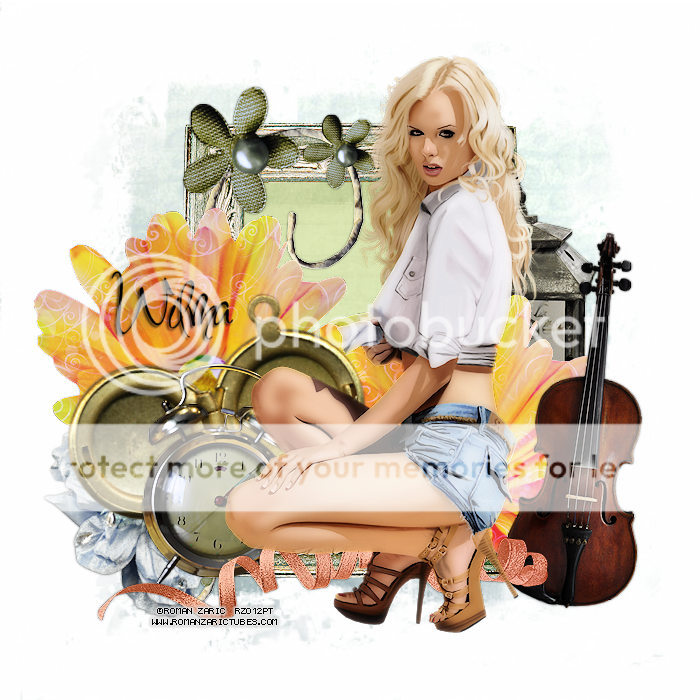
*click on image to view full size*
PTU Sweet Perfection
This tutorial was written by me on December 21, 2012.
It was made out of my own creation and any similarity is purely coincidental.
I used pspx2 but any version should work without problems.
Let's get started!
Artist: Roman Zaric
Scrapkit: Aged to Perfection by Wilma4Ever
Mask: Any of choice
Plugins: xero - porcelain
Font: Inspiration
File - new - 700x700 - flood fill w white
Open el24, resize by 70%, sharpen, c/p as new layer
Image - free rotate to left by 90 degrees, rename frame
Click inside frame, expand by 5, open paper4, c/p as new layer, invert - delete - deselect
Move paper under frame layer
Back to frame, open ele34, resize by 80%, sharpen, c/p as new layer
Image - free rotate to the right by 90 degrees, place so big flower is in corner of frame
Open el33, resize by 50%, sharpen, c/p as new layer, place to left
Open el72, c/p as new layer, place to the right, duplicate and place to left
Open el30, resize by 50%, sharpen, c/p as new layer, place to right
Open el31, resize by 50%, sharpen, c/p as new layer, place to right
Open el55, c/p as new layer, place to right of frame, rotate some w deform tool
Open el54, resize by 50%, sharpen, c/p as new layer, place to right
Open el50, resize by 50%, sharpen, c/p as new layer, place to bottom of frame
Open tube, resize by 70%, sharpen, xero - porcelain, change blue channel to 0
image - mirror
Go to background layer, open paper of choice, c/p as new layer
Apply your mask, merge group, delete background layer
Merge visible, add your credits and your name
Thanks for trying my tutorial :)
Thursday, December 20, 2012

*click on image to view full size*
PTU Sweet N Blue
This tutorial was written by me on
It was made out of my own creation and any similarity is purely coincidental.
I used pspx2 but any version should work without problems.
Let's get started!
Artist: Tony Tzanoukakis
Scrapkit: Something Blue by Stef's Creations
Mask: DBV Masks 133
Plugins: xero - porcelain
Font: Hurricane
File - new - 700x700 - flood fill w black
Open ele23, c/p as new layer
Open pap05, c/p as new layer, place under frame
Click inside frame w magic wand
On paper - invert - delete - deselect
Add drop shadow to frame, merge down to paper
Open ele74, c/p as new layer
Place under frame layer
Open ele32, c/p as new layer, move to right, duplicate, mirror, merge down
Open ele57, resize by 50%, then 70%, sharpen, c/p as new layer, place to right
Back on frame layer
Open ele54, c/p as new layer, place to the right
Open ele24, c/p as new layer
Open ele19, resize by 70%, sharpen, c/p as new layer, place to left bottom of frame
Duplicate 3x and move the flowers so that they are connected in a row, merge flowers together
Open full tube, resize by 75%, c/p as new layer
xero - porcelain - change blue channel to 0, sharpen
Place so its near bottom of frame
Open ele50 - resize by 70%, sharpen, c/p as new layer, place to bottom and rotate w your deform tool
Place under tube layer
Open ele59, resize by 50%, sharpen, c/p as new layer place to the right
Open ele69, place to the right and move so its right above background layer
Close background layer, merge visible, open background
Open paper11, c/p as new layer, move under merged layer, apply your mask, merge group
Delete background, merge visible, add credits and your name.
Thanks for trying my tutorial.

*click on image to view full size*
PTU Orange Winter
This tutorial was written by me on December 20, 2012
It was made out of my own creation and any similarity is purely coincidental.
I used pspx2 but any version should work without problems.
Let's get started!
Artist: Arthur Crowe
Scrapkit: Winter In Orange by Stef's Scrapkits
Mask: Any of choice
Plugins: xero - porcelain
Font: Cherish
File - new - 700x700 - flood fill w white
Open ele61 - c/p as new layer - move down some and to the left
Open mid-size tube - c/p as new layer, place so face is inside left heart
Click inside left heart w magic wand, on tube - invert - delete - deselect
Duplicate and move to middle heart, merge down
Effects - xero - porcelain - change blue channel to 0
change blend to luminance (L) - opacity to 50, duplicate
Change blend to overlay - opacity to 100
click inside all hearts in frame with magic wand - go to paper layer
invert - delete - deselect, close background - merge visible - open background layer
Open ele30, resize 50%, sharpen, c/p as new layer - place to the right
Open ele41, c/p as new layer, move under frame layer, move to bottom
OPen ele38, c/p as new layer, move to the right
Open your full tube - resize to 600px on longest side, c/p as new layer
Place to the right of the tag - I resized it some more w my deform tool but is not necessary - just resize to your liking
On tube - xero - porcelain - change blue channel to 0 - sharpen
Open ele31, resize by 50%, sharpen, c/p as new layer, place on bottom of frame
Duplicate 2x and place to your liking
Open ele32, resize 50%, sharpen, c/p as new layer
Open ele44, resize 50%, sharpen, c/p as new layer, place in top middle some
Close background - merge visible - open background
Open paper of choice, c/p as new layer, move under merged layer
Apply your mask, merge group, delete background layer
Add credits and your name
Tuesday, December 18, 2012

*click on image to view full size*
FTU Bringing In The New Year
This tutorial was written by me on December 18, 2012
It was made out of my own creation and any similarity is purely coincidental.
I used pspx2 but any version should work without problems.
Let's get started!
Artist: Ismael Rac
This tube is called Party Attitude Girl and she'll be coming to the Xeracx store soon!
Scrapkit: FTU Happy Holiday by Disturbed by Gaby
Template: 155 by me HERE
Mask: Melissa'z Creationz mask 6 HERE
Plugins: xero - radiance, eyecandy gradient glow
Font: I used Inspiration
Open template 155, duplicate, close original
Canvas size 800x800, delete cr layer, make background visible, flood fill bkgd white
Go to layer 1, selections all, float, defloat
Open paper010, c/p as new layer, invert, delete, deselect
Go to layer 3, open tube, c/p as new layer
Click inside layer3 with magic wand, on tube - invert - delete
Xero - radiance, change blend to screen, merge down to layer 3
Duplicate - mirror
Open element 050, c/p as new layer, place to left, duplicate, mirror
Open element 037, c/p as new layer, place to the top left, duplicate, mirror
Go to layer4, selections all, float, defloat
Open paper01, c/p as new layer, invert, delete, deselect
Open element 014, c/p as new layer
Merge layer 6 down to 5, add noise, eyecandy gradient glow, medium, black
Delete layer 7
Go to layer 9, open element 065, c/p as new layer
Go to layer 8, click inside of circle w magic wand
open paper012, c/p as new layer, invert, delete, deselect
Go to frame layer, open ele 020, c/p as new layer, move to left some
Open your tube, resize to fit tag, c/p as new layer, xero - radiance
Open element 045, resize by 50%, sharpen, c/p as new layer, place to the right
Open element 046, resize by 50%, sharpen, c/p as new layer, place to the right
On layer 10 apply eyecandy, gradient glow, fat, move to the right and up
Use your deform tool to rotate it some
Delete background layer, merge visible, open paper03, c/p as new layer, place under merged
Apply your mask, merge group
Crop your tag to your liking, merge visible, resize to 700 on longest side, sharpen
Add your credits and your name
Thanks for trying my tutorial :)
Monday, December 17, 2012


Audrey made this amazing New Years tutorial using my template 146.
It is free to use and called 2013 After Party!
You can try it on her blog HERE
Thank you so much for the tag and for using my template once again :)
Big Hugs xo

*click on image to view full size*
PTU Christmas Wishes
This tutorial was written by me on December 17, 2012
It was made out of my own creation and any similarity is purely coincidental.
I used pspx2 but any version should work without problems.
Let's get started!
Artist: Roman Zaric
Scrapkit: Christmas Wishes by Evol Angel Scrapz
You can find it in Scrap Candy
Mask: WSL 84 HERE
Plugins: xero - porcelain
Font: any of choice
*drop shadow is 1 1 50 3 all throughout unless otherwise stated*
File - new - 700x700 - flood fill w white
Open frame2 - c/p as new layer
Open tube close up - resize to your liking - c/p as new layer
Move to the right and under frame - make sure face is inside frame
Duplicate - mirror - merge down
Click inside left side and right side of frame with your magic wand
Expand by 5 - on tube layer - invert - delete - deselect
Go to background layer - open your med size tube - c/p as new layer
Place tube so face is in middle frame - Click inside frame w your magic wand
Expand by 5 - on tube layer - invert - delete - deselect - merge tube layers together
Click inside frame (all squares) with magic wand - expand by 5
On background layer - new layer - flood fill w red from your frame or the blue up to you
On tube layer - xero - porcelain - change blue channel to 0 - change blend to screen - deselect
Close background layer - merge visible - make background layer visible again
Move frame down - open sparkles - c/p as new layer - place on top of frame
Open full-tube - resize to fit your tag - c/p as new layer - place in bottom of tag
Open snowman - resize by 50% - c/p as new layer - place under frame layer and move up
(look at mine for placement or place where you like)
Open present1, resize by 50% - sharpen - c/p as new layer - place to your liking
Open santasack - resize by 50% - sharpen - c/p as new layer - place to right
Open wordart2, c/p as new layer - move so its layer above background layer
Open reindeer - resize by 50% - sharpen - c/p as new layer - place on top of present
Open christmas lights, c/p as new layer, place on top of frame
Make background and full tube layer invisible - merge visible - make background and tube visible
With your text tool and impact font all caps on write CHRISTMAS fg - null, bg red, 125points - convert to raster layer
On Christmas layer - selections all - float - defloat - open paper12 - c/p as new layer
invert - delete - deselect
Add drop shadow of 2 -2 75 5
close background layer - merge visible
Open background - new layer - flood fill w red - apply your mask - merge group
Move mask so its above background layer
Delete background layer - merge visible - add credits - add your name
Thanks for trying my tutorial :)

Sunday, December 16, 2012

Lexi made this fantastic tutorial using one of my KIT exclusive collab templates!
It's called Angels Among Us.
If you're interested in doing this tutorial you can visit her blog HERE
Lexi thanks so much for using my temp and for the awesome tag :)

*click on image to save full-size*
Made another mask :) Hope someone finds use for it lol.
Thanks for stopping by :)

Pamela from Redefined Designs made this awesome New Years Tutorial using my template 146.
If you would like to give this tut a try go HERE
Thanks for using my temp and for the tag Pamela :)

Audrey made this fabulous christmas tutorial using my template 133.
It's called Chocolate Christmas and you can find it on her blog HERE
Thanks for using my template and my tag Audrey :)

Tasha made this awesome Christmas Tutorial using my collab template w Pixie.
It's called So Sweet Christmas and you can find it on her blog HERE
Thanks so much for using my template Tasha :) and for the beautiful tag!

My friend Kat gave me this tag. Its a result of Magic of Winter FTU tut I have :)
Thanks girlfriend! Love it. Ty for trying my tutorial.

EdloEly from Creative Chicks made this awesome tag using one of my wordarts :)
Thanks so much for using my wordart and the pretty tag :)
Saturday, December 15, 2012

This tag was made with the awesome work of Tony Tzanoukakis!
This tube is called Alice and you can find her at his store HERE.
I used PTU Wonderland kit made by Abstract Creations.
This kit is exclusive to CDO.
You can find it HERE.
I used template 152 for this tag.

You can download it HERE
Welcome to the Wilma4Ever "Festival of Lights" Blog Train! Here's the Blogtrain Slideshow, check out all the gorgeous goodies everyone has made...
I made a Layout Template.

You can download it HERE
I also made a tagger template in tag size for our taggers.

You can download it HERE
We are all on different time zones, so if someone doesn't have their part up yet, please check back later.

Friday, December 14, 2012
Welcome to the Scrazy Scrapz Christmas Blog train!
Here is my part of the train :)
Made 4 Christmas Templates!
Hope you can all use them!

You can download them HERE
Make sure to stop by the other designers blogs to pick up their goodies.
*Remember everyone has different time-zones so if something is not up go back to check later on*
Listed are all the Train Stops!
Subscribe to:
Posts
(Atom)


