


Thursday, January 31, 2013

*click on image to view full size*
PTU Kiss Me
This tutorial was written by me on January 31, 2013.
It was made out of my own creation and any similarity is purely coincidental.
I used pspx2 but any version should work without problems.
Let's get started!
Artist: Roman Zaric
Scrapkit: Wanna Be My Valentine by Stef's Scrapkits
40% off on all Valentine's Day Kits until Valentine's Day
Plugins: Porcelain
Font: Allura
File - new - 700x700 - flood fill w white - rename background
Open ele11, resize by 80%, sharpen, c/p as new layer
Open paper4, c/p as new layer, move under frame
With selection tool draw a rectangle bigger than the inside of your frame
On paper layer, invert, delete, deselect
Open your tube, resize it to your liking to fit your tag, c/p as new layer
Place on top of frame layer, duplicate your frame and place dup above your tube
With your eraser erase the top of the frame that is covering the tube
Back on tube apply xero - porcelain with blue channel at 0, hit ok, then sharpen
Close background, merge visible, open background
Open ele31, resize by 50%, sharpen, c/p as new layer, place to the right
Open ele47, resize by 60%, c/p as new layer, place to the right, duplicate, mirror
Open ele18, c/p as new layer, place to the left
Open ele43, resize by 65%, c/p as new layer, place to right, duplicate, mirror
Open ele38, resize by 50% 2x, sharpen, c/p as new layer, place to the right
Duplicate, mirror
Duplicate, move down some, then duplicate and mirror again
Open ele48, resize by 50%, sharpen, c/p as new layer, place to the left
Open ele44, resize by 50% 2x, sharpen, c/p as new layer, place to right
Open ele22, resize by 50% 2x, sharpen, c/p as new layer, place to right
Open ele45, resize by 70%, sharpen, c/p as new layer, place to right
Open ele20, c/p as new layer, place to the bottom and move under frame layer
Open ele50, c/p as new layer
Delete background, merge visible, add your credits and name

So Kimberly and me got together again. :)
This time we bring some Anti-Valentines Templates.
Hope you like them.
You can visit her blog and get a load of her freebies: Scrap Rebellion
You can download them HERE or there.
These will be in a challenge in the KIT Forum so stop by :)
Thanks for stopping by :)

This tag was made with the fabulous work of Tony Tzanoukakis.
This kit was made to match by Irish Princess Designs.
The kit and tube are available in Tony's store HERE
Here's the template that I used.

You can download them HERE

This tag was made with the wonderful artwork of Arthur Crowe!
You can find this tube in his store HERE
I used PTU Heartbreaker kit by Alika's Scraps.
You can find this kit in O'Scrap Shack
I made a template to use also.

You can download it HERE

From Kimberly

From Christene


These 2 from Liz


These two from Scarab

From Abby
Thank you all so so much for using my templates!
I can't stress enough how great it makes me feel to get my tags!
Hugs!


Jeannine made this awesome tutorial using one of my temps!
If you would like to try it, you can find it on her blog HERE

Audrey made this adorable tutorial using one of my temps!
You can find it on her blog HERE

Another fabulous tutorial from Audrey!
You can try it on her blog HERE
Girls thank you so much for using my templates and for taking the time to send me a tag!
I really appreciate it!
*Big Hugs*
Wednesday, January 30, 2013

Tuesday, January 29, 2013

*click on image to view full size*
PTU Bee My Valentine
This tutorial was written by me on January 29, 2012.
It was made out of my own creation and any similarity is purely coincidental.
I used pspx2 but any version should work without problems.
Let's get started!
Artist: Ismael Rac
Scrapkit: Bee Mine by Evol Angel Scrapz
You can find it in Scrap Candy.
Template: 185 by myself. You can find it HERE
Mask: any of choice
Plugins: porcelain
Font: Crushed Out Girl
F = float, DF= defloat, DS = drop shadow
*open your mask and minimize it in your workspace*
Open template 185, duplicate, close original.
Change canvas size to 700x700.
Make your background layer visible and delete cr layer.
On layer1, selections all, f, df, new layer, open paper 3, paste into selection.
Selections, modify, select selections borders, both sides, width 3, hit ok.
New layer, flood fill w pink from paper, add noise, uniform, 50, hit ok.
Deselect and add ds of your choice.
On layer2, selections all, f, df, new layer, open paper 11, paste into selection.
Deselect and add ds of your choice.
Open honeycomb, resize by 85%, sharpen, c/p as new layer, rotate to right some.
On layer3, selections all, f, df, new layer, open paper 8, paste into selection.
Deselect and add ds of your choice.
On layer4, selections all, f, df, new layer, open paper 10, paste into selection.
Deselect and add ds of your choice.
On layer5, selections all, f, df, new layer, open paper 5, paste as new layer.
Invert, delete.
Deselect and add ds of your choice.
Open tube close up, c/p as new layer, place face inside heart to the left
Xero - porcelain - same as before, change blend to screen.
Click inside layer 7(heart) with magic wand, on tube layer, invert, delete, invert.
Open paper 11, c/p as new layer, move under tube closeup, invert, delete, deselect.
On layer 6, add ds of choice.
Open bow1, resize by 75%, sharpen, c/p as new layer, place to left, add ds.
Open heart bling, resize by 80%, sharpen, c/p as new layer.
Open heartwings, resize by 50%, sharpen, c/p as new layer, place to right.
On layer 7, selections all, f, df, new layer, open paper 11, paste as new layer.
Apply inner bevel w following settings
Bevel:2, width 5, smoothness 2, depth 2, ambience 2, shininess 2
color white, angle 315, intensity 50, elevation 30, hit ok
Effects - eyecandy - gradient glow
width 3, color medium and use pink from the tag
Open box, resize by 50%, sharpen, c/p as new layer, add ds.
Open tube, c/p as new layer, mirror, place to right some
Xero - porcelain, change blue channel to 0, sharpen
Open double hanger, c/p as new layer, place to bottom and to right some.
Open honeyjar, resize by 50%, 2x, sharpen, c/p as new layer, place to right.
Open gift, resize by 50%, 2x, sharpen, c/p as new layer, place to right.
On layer 8, change blend mode to screen.
Drop Shadow of 2 -2 75 5 black, duplicate.
Go to background layer, open honeydrips, resize by 70%, sharpen, c/p as new layer.
Move and place down.
Delete background. Merge visible.
Open paper9, c/p as new layer.
Layers - new mask layer - from image - find mask in source window, hit ok.
Merge group. Merge visible. Add credits and your name.
Thanks for trying my tutorial.

Monday, January 28, 2013

I made some exclusive Valentine's Day templates for the BikerSkunkTagz forum.
You can find them their blog HERE
Thanks for stopping by :)
Sunday, January 27, 2013
*click on image to view full size*
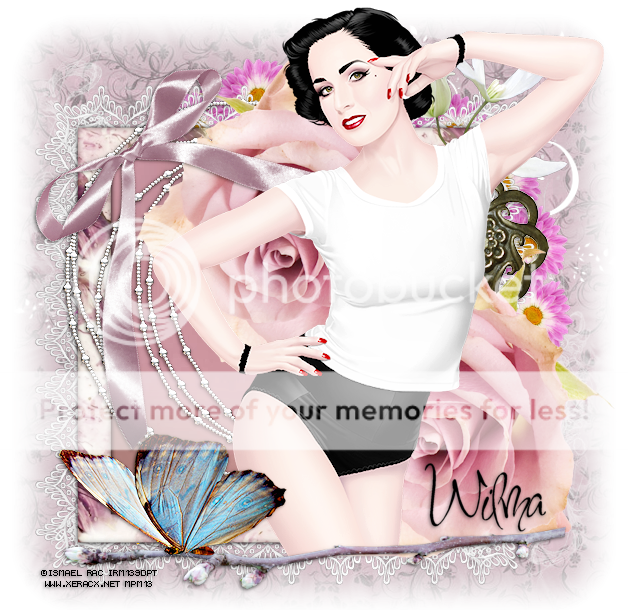
PTU Pretty
This tutorial was written by me on January 27, 2013.
It was made out of my own creation and any similarity is
purely coincidental.
I used pspx2 but any version should work without problems.
Let's get started!
Artist: Ismael Rac
Scrapkit: Burlesque by Wilma Forever
Mask: any square mask of choice
Font: Inspiration
*open your mask and minimize it in your workspace*
File - New - 700x700 - Flood Fill with white - rename background
Open paper8, c/p as new layer
layers - new mask layer - from image
find your mask in source window, hit ok, merge group
Open ele11, c/p as new layer, click inside frame and expand by 10
Open paper1, c/p as new layer, move under frame, invert, delete
deselect
Open ele7, c/p as new layer, place to the right some
Move under paper layer
go back to frame layer
Open ele5, resize by 70%, sharpen, c/p as new layer
Open ele29, c/p as new layer, place to the right
Open ele30, resize by 85%, sharpen, c/p as new layer, place to right
Open ele9, c/p as new layer, place to right
Duplicate and move to the top and to the left a bit
Open ele28, c/p as new layer, move to the top left and rotate some
Open tube, resize by 80%, c/p as new layer, place to the right
Open ele19, resize by 80%, sharpen, c/p as new layer, place down some
Open ele16, resize by 65%, sharpen, c/p as new layer, place to bottom left
Delete background layer, merge visible, add credits and name

From Chelle


From Kimberly

From Mary

From Rissa

From Shauna

Tutorial from Jeannine using my template 168
You can find it on her blog HERE
Thank you all so much for all the awesome tags you made using my templates :)
Friday, January 25, 2013

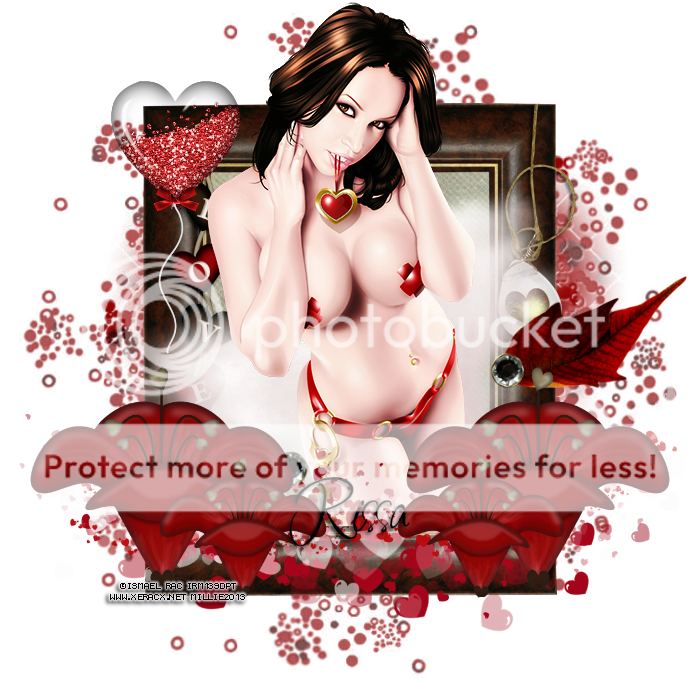
This tag was made with the fabulous work of Ismael Rac.
The kit used is called Heart's Desires by Rissa's Creations!
Here are some snags I made for you all.
Click on image to save full-sized!


Guest Promo Team Call for Rac, Crowe, Zaric and Tony Tz.

*click on image to view full size*
PTU Eye Love You
This tutorial was written by me on January 25, 2013.
It was made out of my own creation and any similarity is purely coincidental.
I used pspx2 but any version should work without problems.
Let's get started!
Artist: Ellie Milk
Scrapkit: Eye Heart You by Scraps by Danielle
You can find it in her store HERE
OR in ScrapCandy HERE
Mask: any of choice
Font: Love Ness Three
*open your mask and minimize it in your workspace*
File - new - 700x700 flood fill w white - rename background
Open heart frame, c/p as new layer
Open tube, resize to fit your tag, c/p as new layer
Duplicate and move under frame, erase bottom of tube
On top tube erase so that it looks like it's inside the frame
Add 2 -2 75 3 drop shadow to your frame in black
Go to background layer, open paper1, c/p as new layer
With selection tool draw a square around the frame, on paper, invert, delete, deselect
On frame layer, open fan, resize by 85%, sharpen, c/p as new layer, place to top left
Open heart martini, c/p as new layer, place to top right
open flower, resize by 50%, sharpen, c/p as new layer, place to right
Duplicate your flower, move bottom flower up some, merge down
Duplicate and mirror
Open I love you, resize by 50%, sharpen, c/p as new layer, place to the right
Go to the top layer, open cupid teddy, resize by 50%, sharpen, c/p as new layer
Place to bottom left
Go to background layer, open paper10, c/p as new layer
Layers - new mask layer - find your mask name in source window, hit ok, merge group
Delete background, merge visible, add your credits and your name

*click on image to view full size*
PTU Forever In My Heart
This tutorial was written by me on January 25, 2013.
It was made out of my own creation and any similarity is purely coincidental.
I used pspx2 but any version should work without problems.
Let's get started!
Artist: Ismael Rac
Scrapkit: Power of Love by Stef's Scrapkits
40% off from now
till Valentine's Day on Kits in
Valentine's Day Theme!
Mask: Horseplay's Pastures - Mask 11
Plugins: Xero - porcelain
Font: I used From Me to You
*open your mask and minimize it in your workspace*
File - new - 700x700 flood fill w white
Open paper 3, c/p as new layer
Apply your mask - layers - new mask layer - from image
find name of your mask in your source window and hit ok - merge group
Open ele44, c/p as new layer, place to right, duplicate, mirror
Open ele36, resize by 80%, c/p as new layer
Open ele79, resize by 75%, sharpen, c/p as new layer
Open tube close up, c/p as new layer, move under frame
Xero - porcelain default settings
With your selection tool draw a rectangle around frame
On tube layer, invert, delete, deselect
On frame add drop shadow of 2 -3 65 7 black
Open ele73, c/p as new layer, place to top left
Place under tube layer, add ds of 1 -1 50 3, duplicate move up some
Open ele40, c/p as new layer, place above frame and move down
Open ele38, resize by 50%, sharpen, c/p as new layer, place to right
duplicate, move up some, merge down, duplicate resize by 70%
mirror, move to the right, merge down
Duplicate and change blend mode to screen
Open ele45, resize by 70%, sharpen, c/p as new layer, place to right
Open ele80, resize by 50%, sharpen, c/p as new layer
Move to the bottom right and rotate it to the left some w deform tool
Open ele62, resize by 50%, sharpen, c/p as new layer
Place to top left corner, duplicate, move up some
Open ele20, resize by 80%, sharpen, c/p as new layer, place to bottom left
Delete background layer and merge visible, add your credits and your name
Thursday, January 24, 2013


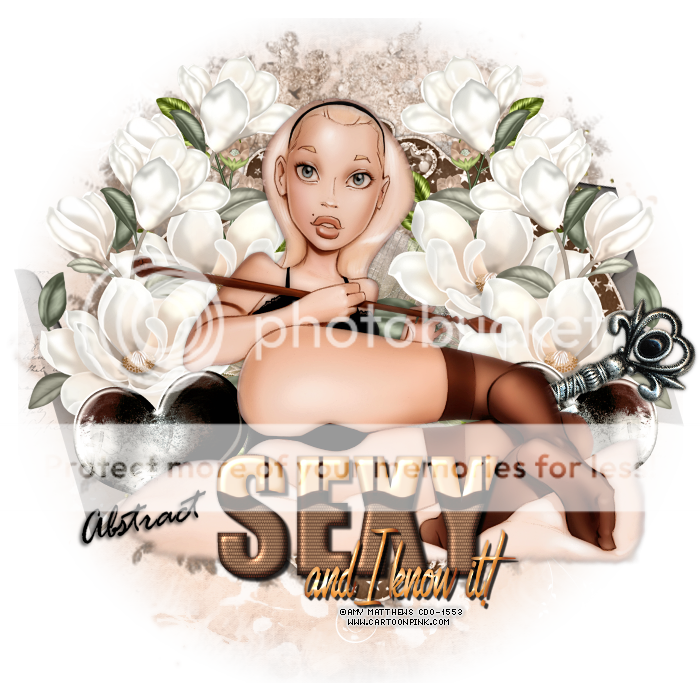
This tag was made with the beautiful work of Amy Matthews.
The scrapkit used comes with the pack #36 as a bundle pack.
You can find it HERE.
Made some snags for you.
*click on image to save full-size*
Thanks for stopping by :)


from Laura!
I love this. Came out beautiful!
Thank you!

From Kate! Awesome work hon! ty so much!

From Sandra!
Thank you so much for this fabulous tag!

From Sue!
Just awesome hon! Thanks so much!

From Rissa! Love it! Hot tag!


From Chelle! Thank you so much.
These are wonderful!
There are more but I'll post them at another time.
I have to get busy!
Thank you all so much again for my tags and using my templates!
Subscribe to:
Posts
(Atom)


