


Wednesday, April 30, 2014

*click on image to view full size*
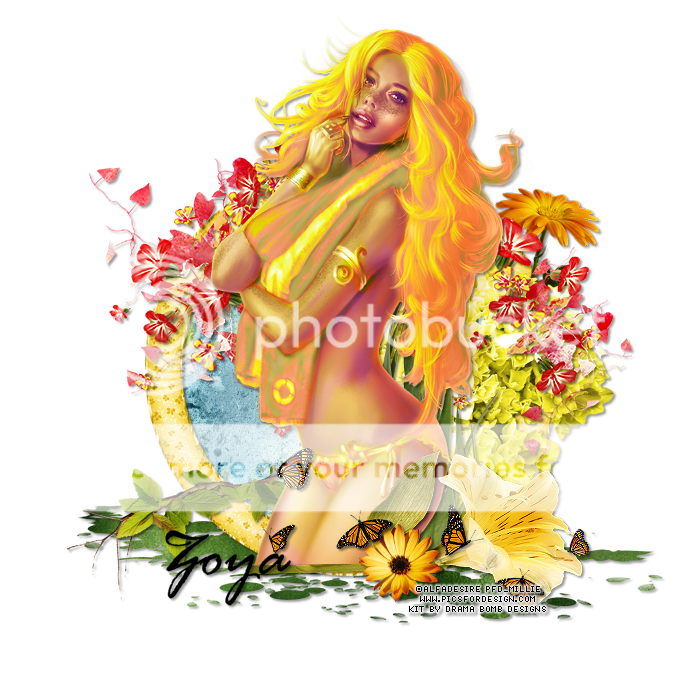
PTU Her Beauty Leaves You Breathless
This tutorial was written by me on April 30, 2014.
It was made out of my own creation and any similarity is purely coincidental.
I used pspx5 but any version should work without problems.
If you're doing this tutorial you must have good psp knowledge and be familiar with the tools.
Let's get started!
Artist: 2013 Classy Beauty by Ismael Rac
Scrapkit: Just Breathe by Honored Scraps
Mask: Moonbeams and Spiderwebs mask 19 HERE
Plugins: Lokas 3D Shadow, Xero - Radiance
Font: A & S Snapper Script
*open your mask and minimize in your workspace*
c/p = copy and paste, ds = drop shadow
File - New - 700x700 - flood fill w white
Open 38 - c/p as new layer - move down some
Click inside your frame w magic wand - expand by 5 - new layer
Open paper8 - c/p into selection - deselect
Move paper under frame
On frame apply Lokas 3d Shadow w following settings:
Blur: 25 Transparency: 70
Angle X: 0 Angle Y: 0 Angle Z: 0
Zoom: 100 Offset X: 5 Offset Y: 5
Perspective: 40 Color: Black
Hit Okay
Open 56 - place to left - ds
Open 36 - resize by 50% - sharpen - place to left - ds
Open 32 - resize by 50% 2x - sharpen - place to left - ds
Open 33 - resize by 50% 2x - sharpen - place to left - ds
Open your tube - resize by 75% - c/p as new layer
Place tube so that the top half is placed to fit the frame
With your selection tool draw a rectangle around the tube
Invert - delete - deselect
Xero - radiance - change beauty to 179 - hit ok - ds tube
Open 4 - resize by 50% - place to bottom and right some - ds
Open 37 - resize by 50% 2x - sharpen - place to right and bottom - ds
Open 31 - resize by 50% - sharpen - place to bottom left - ds
Open 1 - resize by 50% 2x - sharpen - place to bottom right - ds
On background
Click on background with magic wand - new layer
Open paper13 - c/p into selection - deselect
Layers - New mask layer - From Image
Find your mask in source window - hit ok
Merge group
Resize your mask a little bit
Open 29 - resize by 50% - sharpen place to top rotate towards left
Duplicate - mirror - place down a little bit - merge down
Duplicate - flip - place where it looks best - merge down - ds
Open 46 - place to bottom right - ds - duplicate - mirror
Open 27 - place to the right - ds
Delete background layer and merge visible
Crop your tag to your liking
Adjust - Brightness and Contrast
Local Tone Mapping - strength 2.0 - Block Size 15 - hit ok
Add Credits and name


Tuesday, April 29, 2014

*click on image to view full size*
PTU Time for the Fiesta
This tutorial was written by me on April 29, 2014.
It was made out of my own creation and any similarity is purely coincidental.
I used pspx5 but any version should work without problems.
If you're doing this tutorial you must have good psp knowledge and be familiar with the tools.
Let's get started!
Artist: Hot Tamale by Arthur Crowe
Scrapkit: Viva la Fiesta by Scrappin Krazy Designs
Plugins: Lokas 3D Shadow and Xero Radiance
Mask: 41 by me HERE
Font: Duality
*open your mask and minimize in your workspace*
c/p = copy and paste, ds = drop shadow
File - New - 700x700 - flood fill w white
Open 51 - resize by 70% - sharpen
Image - free rotate - left by 90 degrees - hit ok
Click inside your frame w magic wand - expand by 5 - new layer
Open paper10 - c/p into selection - deselect
Move paper under frame
On frame apply Lokas - 3D Drop shadow w following settings:
Blur: 25 Transparency: 70
Angle X: 0 Angle Y: 0 Angle Z: 0
Zoom: 100 Offset X: 5 Offset Y: 5
Perspective: 40 Color: Black
Hit Okay
Duplicate your frame and place under paper
rotate to the right by 18 degrees
duplicate again - mirror - move left a little
Close background layer - merge visible - open background layer
On merged layer
Open 24 - resize by 50% 2x - sharpen - place to the bottom right - ds
Open 56 - place to the bottom - ds
Open 42 - resize by 50% 2x - sharpen - place to left - ds
Open 22 - place to the left - ds
Open half tube - resize to fit your tag and place to the right some
Apply Xero - radiance and change beauty to 158 - hit ok - ds on tube
Open 46 - resize by 50% 2x - sharpen - place to bottom right - ds
Open 44 - resize by 50% 2x - sharpen - place to bottom and right some - ds
Open 43 - resize by 50% 2x - sharpen - place to bottom - ds
Open 25 - resize by 50% 2x - sharpen - place to bottom left - ds
Open 18 - resize by 50% 2x - sharpen - place to bottom left - ds
Open 17 - resize by 50% 2x - sharpen - place to bottom left - ds
On background layer
Click on background with magic wand - new layer
Open paper16 - c/p into selection - deselect
Layers - New mask layer - From Image
Find your mask in source window - hit ok
Merge group
Open 60 - place to the right - ds
Delete background - merge visible
Add credits and name
Friday, April 25, 2014

This tag was made with 2014 Happy Girl tube by Ismael Rac
YOu can grab her in his store HERE
I used PTU Sweet and Tangy kit by PO-Concept
You can grab it in PFD Here

Another tag using 2014 Happy Girl and Sweet and Tangy Kit
Template 574

You can download it HERE
There is also an awesome sale going on at the Xeracx Store
If you're a fan you are going to want to take advantage of this sale!
50% OFF all tubes, kits, and cu packs!

Thursday, April 24, 2014

This tag was made with 2014 Ready for Summer tube by Ismael Rac
I also used the matching scrapkit by Creations by Sanie
You can find them both soon in his store HERE

This tag was also made with Ready 4 Summer tube and matching kit.
Remember to visit the xeracx store
Template 573

You can download it HERE


Tuesday, April 22, 2014


Mask 43

Mask 44
Hope you can use and enjoy these.
Remember to click on the image to save them full-sized as they are 700x700
Thank you for stopping by!

*click on image to view full size*
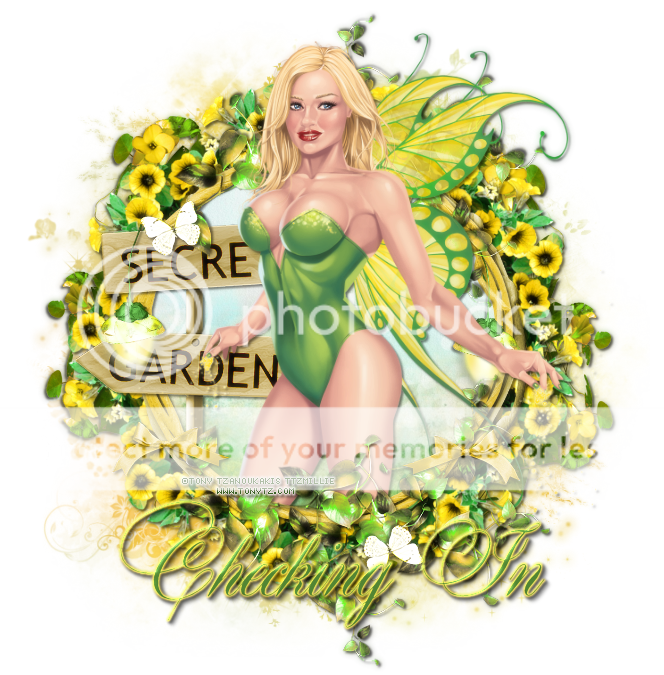
PTU Party In The Garden
This tutorial was written by me on April 22, 2014.
It was made out of my own creation and any similarity is purely coincidental.
I used pspx5 but any version should work without problems.
If you're doing this tutorial you must have good psp knowledge and be familiar with the tools.
Let's get started!
Artist: Garden Party by Eos Sparks
Scrapkit: Garden Party by Gimptastic Scraps
Mask: MB and SW mask 19
Plugin: Lokas 3D Shadow
Font: Housegrind
*open your mask and minimize in your workspace*
File - New - 700x700 - flood fill w white
Click on background with magic wand - new layer
Open paper of choice - c/p into selection - deselect
Layers - New mask layer - From Image
Find your mask in source window - hit ok
Merge group
Open frame 6 - c/p as new layer
Click inside your frame w magic wand - expand by 5 - new layer
Open paper1 - c/p into selection - deselect
Move paper under frame
Apply Lokas 3D Shadow to frame w these settings
Blur: 25 Transparency: 70
Angle X: 0 Angle Y: 0 Angle Z: 0
Zoom: 100 Offset X: 5 Offset Y: 5
Perspective: 40 Color: Black
Hit Okay
Merge frame down to paper
Open frame 5 - apply Lokas 3D Shadow with same settings as above
Merge frame down to merged layer
Open flower 1 - place to the right - drop shadow
Open bow - resize by 50% - sharpen - place to top and move left some
Add drop shadow to your bow
Open bulrushes - place to the right - drop shadow
Open branch 3 - place to the left - drop shadow
Open flower 2 - resize by 50% 2x - sharpen - place to bottom right - drop shadow
Duplicate flower2 - mirror
Open WA - resize by 50% - place to the bottom - drop shadow
Open rope - resize by 50% 2x - sharpen - place to bottom right - drop shadow
Open orchid - resize by 50% - place to the bottom right - drop shadow
Duplicate orchid - mirror
Open tube - resize to fit your tag - move down some - drop shadow
Open berries 1 - resize by 50% - place to the bottom - drop shadow
Open snail 3 - resize by 50% 2x - sharpen - place to bottom left - drop shadow
Open orchid - resize by 50% 2x - sharpen - place to bottom left - drop shadow
duplicate orchid - mirror
Open frog - resize by 50% 2x - sharpen - place to bottom - drop shadow
Open waterlily - resize by 50% 2x - sharpen - place to bottom right - drop shadow
Delete background - merge visible
Crop your tag to your liking
Add credits and name
Monday, April 21, 2014

This tag was made with awesome Amelia tube by Roman Zaric
I also used the matching scrapkit by Wicked Princess Designs
They are both coming soon to the Roman Store!
So keep your eyes peeled for this beautiful combo!

Timeline made with same combination as above.
Remember to visit the RomanZaric Store as these will be available very soon!
Timeline template 64

You can download the template HERE

This tag was made with Emmanuela tube by Roman Zaric
I used PTU Hoppy Easter Kit by Kizzed by Kelz


3 pc set will be posted for the always list... eventually LOL
Surely before spring ends *laughing* Hopefully :)

This template was from Finish This Temp challenge from Misfits
(which i was late for bah) LOL
And here are some snags for you all.
Please click on images to save them full sized.
Please do not claim my snags as your own or alter them in any way!
Thanks!


Saturday, April 19, 2014

This tag was made with lovely Fairy Dust tube by Tony Tzanoukakis
You can find it in his store HERE
I used PTU Enchanted Garden kit by Dees'Sign Depot
You can grab it at her store HERE

Another tag with awesome Fairy Dust tube and fabulous Enchanted Garden Kit
I also made some snags.
I hope you can use them and please do not alter them.


This tag was made w XAttitude by Ismael RAc
You can grab her in his store HERE
I used PTU Urban Chic kit by Abstract Creations
You can find it in her store HERE

This tag was also made w X Attitude tube and Urban Chic Kit
Here are some snags for you all.
Hope you like and can use them.
Please do not alter them in any way!
Thanks for stopping by :)


SPECIAL BUY 4-18-14 TO 4-21-14
Spend any $$ in the store and get either this cutie girl tube OR X Attitude tube for free. Just add ONE of them to your cart at check out and GC is not accepted as a form of payment. It is your choice!
Friday, April 18, 2014

*click on image to view full size*
PTU Flowers Feed The Soul
This tutorial was written by me on April 18, 2014.
It was made out of my own creation and any similarity is purely coincidental.
I used pspx6 but any version should work without problems.
If you're doing this tutorial you must have good psp knowledge and be familiar with the tools.
Let's get started!
Artist: Violette by Verymany
Scrapkit: Garden Flame by Tiny Turtle Designs
Mask: 31 by me HERE
Plugins: Xero Radiance and Lokas 3D shadow
Font: Susies Hand and Modern 20
*open your mask and minimize in your workspace*
File - New - 800x800 - flood fill w white
Open 88 - resize by 70% - sharpen - place to the right
Open tube - c/p as new layer - place under frame
Make sure the face is inside of the frame
Click inside your frame w magic wand - expand by 5 - new layer
Open paper1 - c/p into selection
Move paper under tube
On tube layer - invert - delete - deselect
Xero - radiance - default settings - hit ok
Change your blend to overlay
On frame apply Lokas 3D shadow w following settings:
Blur: 25 Transparency: 70
Angle X: 0 Angle Y: 0 Angle Z: 0
Zoom: 100 Offset X: 5 Offset Y: 5
Perspective: 40 Color: Black
Hit Okay
Apply it a second time
Close background layer - merge visible - open background
Duplicate merged - mirror - resize duplicate by 70%
Open 110 - resize by 50% 2x - sharpen - place to the right
Rotate to the right some and add drop shadow
Open 61 - resize by 50% - place to bottom - drop shadow
Open 183 - resize by 50% 2x - sharpen - place to bottom right - drop shadow
Open 62 - resize by 50% 2x - sharpen - place to the bottom and right
drop shadow
Open 10 - resize by 50% 2x - sharpen - place to bottom - drop shadow
Open 14 - place to bottom right -drop shadow
Open 76 - resize by 50% - rotate to right some and place to right
Add drop shadow
Open 53 - resize by 50% - sharpne - place to the bottom right - drop shadow
Open 52 - - resize by 50% 2x - sharpen - place to bottom left - drop shadow
Duplicate 53 - mirror and place above 52
Open tube - resize to fit your tag
Apply Xero - radiance with the following settings:
strangeness 128 charm 50
truth 128 beauty 103
hit ok - add drop shadow to your tube
With your text tool write Flowers with Susie's Hand font 72pt or size u like
Convert to raster layer
Change your font to modern 20 - size 36 and write feed the soul
Convert to raster layer - merge flowers and other words together
Rotate to the left some - place to left - add drop shadow
Add any other elements you might want
On background layer
Click on background with magic wand - new layer
Open paper17 - c/p into selection - deselect
Layers - New mask layer - From Image
Find your mask in source window - hit ok
Merge group
Resize mask by 50% place to right duplicate mirror merge down
Open 75 - place to left - drop shadow
Delete background layer and merge visible
Add credits and name
Thanks for trying my tutorial!
Mask 41

Mask 42

Click on image to download full-sized!
I hope you like these and thanks for stopping by :)
Subscribe to:
Posts
(Atom)


