


Showing posts with label Scrappin Krazy Designs. Show all posts
Showing posts with label Scrappin Krazy Designs. Show all posts
Monday, October 27, 2014

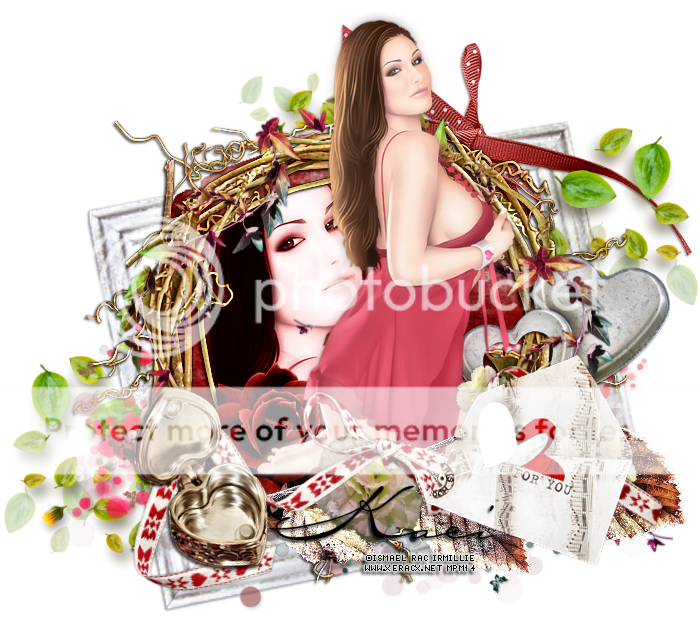
Tuesday, October 14, 2014

This tag was made with 2012-2014 Lady Pumpkin Revamp SL by Ismael Rac
I used PTU Halloween Mega KIt by Scrappin' Krazy Designs
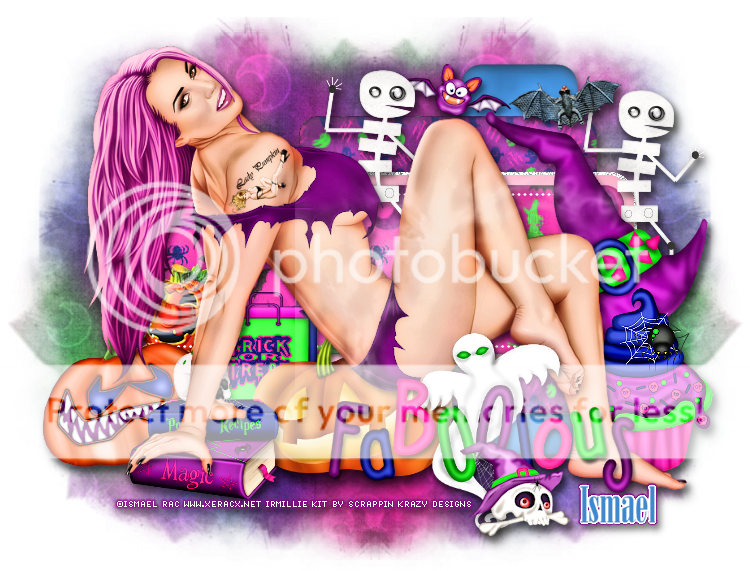
Template 698

You can download HERE

**SPECIAL BUY 10-13-14 TO 10-14-14 **
http://store.xeracx.net/
Get the 2012-2014 Lady Pumpkin Revamp HD. Complete Revamp Tube NOW with Customizable Layers. FREE with a $2.00 Purchase . Just pop it in your cart at check out. No GC's accepted as a form of payment.
http://store.xeracx.net/
Get the 2012-2014 Lady Pumpkin Revamp HD. Complete Revamp Tube NOW with Customizable Layers. FREE with a $2.00 Purchase . Just pop it in your cart at check out. No GC's accepted as a form of payment.
Saturday, September 20, 2014

Thursday, August 28, 2014

*click on image to view full size*
PTU Pinup Fantasy
This tutorial was written by me on August 28, 2014.
It was made out of my own creation and any similarity is purely coincidental.
I used pspx6 but any version should work without problems.
If you're doing this tutorial you must have good psp knowledge and be familiar with the tools.
Let's get started!
Artist: 2014 PinUp Look by Ismael Rac
Scrapkit: Fantasy Garden by Scrappin' Krazy Designs
Mask: 17 by me HERE
Plugins: Xero - Radiance
Font: aka Dora
*open your mask and minimize in your workspace*
c/p = copy and paste, ds = drop shadow
File - New - 700x700 - flood fill w white
Open 15 - resize by 65% - c/p as new layer
Image - free rotate by 90 degrees - to the right - hit ok
Click inside your frame w magic wand - expand by 5 - new layer
Open paper1 - c/p into selection - deselect
Move paper under frame
Add drop shadow to your frame
Open 39 - resize by 50% - place to top left - ds
Open 66 - resize by 50% - place to top right - ds
Open 54 - place to bottom - ds
Open 70 - place to the right - ds
Open half tube - resize to fit your tag - c/p as new layer
Move to bottom some
Xero - radiance - change beauty to 94 - hit ok
Add drop shadow to your tube
Open 76 - place to right some - ds
Open 6 - resize by 50% 2x - sharpen - place to bottom left - ds
Open 18 - resize by 50% 2x - sharpen - place to bottom right - ds
Open 14 - resize by 50% 2x - sharpen - place to bottom right - ds
Open 25 - resize by 50% - place to the bottom - ds
On background layer
Open 78 - place to the right - ds
Open 34 - place to right - ds
Open 27 - resize by 50% - place to right - ds
Delete background layer - merge visible
Add credits and name

** SPECIAL BUY 8-28-14 TO 8-29-14 **
http://store.xeracx.net/
Spend any $$ in the store and get the 2014 BB Pinup Girl Tube Or The 2014 Pinup Look Tube. Just pop it in your cart at check out. No GC's accepted as a form of payment.
http://store.xeracx.net/
Spend any $$ in the store and get the 2014 BB Pinup Girl Tube Or The 2014 Pinup Look Tube. Just pop it in your cart at check out. No GC's accepted as a form of payment.
Monday, August 11, 2014
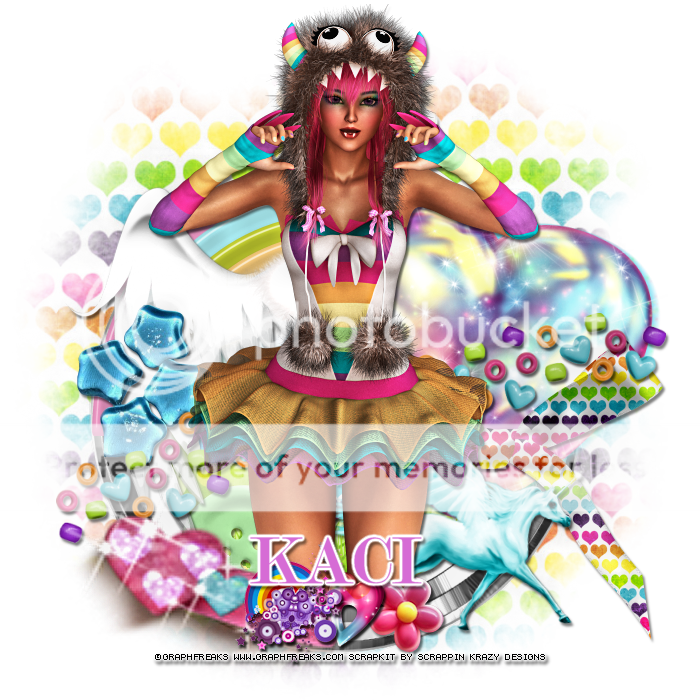
This tag was made with 2013 Naughty X Girl by Ismael Rac
I used PTU Natalie kit by Scrappin Krazy Designs


SPECIAL BUY 8-10-14 TO 8-11-14
http://store.xeracx.net/
Spend any $$ in the store and get the 2013 Shopaholic Tube HD OR 2013 Naughty X Girl HD SL Tube . Just pop it in your cart at check out. No GC's accepted as a form of payment.
Friday, July 25, 2014
*click on image to view full size*
PTU So Rainbowlicious
This tutorial was written by me on July 24, 2014.
It was made out of my own creation and any similarity is purely coincidental.
I used pspx6 but any version should work without problems.
If you're doing this tutorial you must have good psp knowledge and be familiar with the tools.
Let's get started!
Artist: Kazuki by Graph Freaks
Scrapkit: Rainbow Kazuki by Scrappin Krazy Designs
Mask: DBV mask 111
Font: Modern20
*open your mask and minimize in your workspace*
c/p = copy and paste, ds = drop shadow
File - New - 700x700 - flood fill w white
Click on background with magic wand - new layer
Open paper14 - c/p into selection - deselect
Layers - New mask layer - From Image
Find your mask in source window - hit ok
Merge group
Open 47 - resize by 75% - c/p as new layer - move down some
Click inside frame w magic wand - expand by 5 - new layer
Open pp7 - c/p into selection - deselect
Move paper under frame
Add drop shadow to your frame
Open 41 - bottom left - ds
Open 43 - place to top - ds
Open 8 - place to left - ds
Open 1 - place to the right - ds
Open 66 - place to the right - ds
Open 52 - resize by 50% - place to the left - ds
Open 50 - resize by 80% - c/p as new layer - ds
Open 42 - resize by 50% - place to bottom right - ds
Open tube - c/p as new layer
Duplicate tube - change blend to overlay and opacity to 50
Open 7 - place to bottom left - ds
Open 13 - resize by 50% 2x - sharpen - place to bottom - ds
Open 10 - resize by 50% 2x - sharpen - place to bottom - ds
Open 17 - resize by 50% 2x - sharpen - place to bottom - ds
Delete background - merge visible
Add credits and name
Saturday, July 19, 2014

*click on image to view full size*
PTU Flowery Goodness
This tutorial was written by me on July 19, 2014.
It was made out of my own creation and any similarity is purely coincidental.
I used pspx6 but any version should work without problems.
If you're doing this tutorial you must have good psp knowledge and be familiar with the tools.
Let's get started!
Artist: Sweet on You by Ismael Rac
Scrapkit: Peace and Daisies Kit by Scrappin Krazy Designs
Plugins: Xero - Radiance
Mask: 31 by me HERE
Font: Mf Queen Leela
*open your mask and minimize in your workspace*
c/p = copy and paste, ds = drop shadow
File - New - 700x700 - flood fill w white
Open 15 - resize by 75% - c/p as new layer
Click inside your window in the middle w magic wand - expand by 5 - new layer
Open paper12 - c/p into selection - deselect
Move paper under frame
Add drop shadow to your frame
Open 55 - move to the bottom - ds
Open 21 - place to bottom - ds
Open your tube - resize to fit your tag - c/p as new layer
Xero - radiance - change beauty to 97 - hit ok
Drop shadow your tube
Open 19 - resize by 50% - place to the bottom - ds
Duplicate - mirror
On background layer
Open 27 - place to left - duplicate - mirror - merge down - ds
Open 17 - place to left - duplicate - mirror - merge down - ds
Open 14 - place to right - duplicate - mirror - merge down - ds
Delete background layer - merge visible
Add credits and name
Friday, June 27, 2014

*click on image to view full size*
PTU Miss the Sea
This tutorial was written by me on June 27, 2014.
It was made out of my own creation and any similarity is purely coincidental.
I used pspx6 but any version should work without problems.
If you're doing this tutorial you must have good psp knowledge and be familiar with the tools.
Let's get started!
Artist: Sea Star by Trinita
Scrapkit: Oceana by Scrappin Krazy Designs
Mask: DBV 111
Font: Snap ITC
*open your mask and minimize in your workspace*
c/p = copy and paste, ds = drop shadow
File - New - 700x700 - flood fill w white
Open 5 - resize by 50% - place to the right - rotate right some
Open tube - place face inside the frame
Xero - radiance - beauty 97 - hit ok
Move tube under the frame
On frame using your freehand selection tool draw around the frame
On tube - invert - delete - invert - new layer
Open pp5 - c/p into selection - deselect
Move paper under tube layer
On tube - change blend mode to screen
On frame apply LOKAS 3D SHADOW w following settings:
Blur: 25 Transparency: 70
Angle X: 0 Angle Y: 0 Angle Z: 0
Zoom: 100 Offset X: 5 Offset Y: 5
Perspective: 40 Color: Black
Hit Okay
Open 24 - resize by 50% 2x - sharpen - place to top right - ds
Open 6 - place to the left - ds
Open 7 - resize by 50% 2x - sharpen - place to bottom left - ds
Open 35 - resize by 50% 2x - sharpen - place to bottom right - ds
Open 46 - resize by 50% 2x - sharpen - place to bottom - ds
Open 20 - resize by 50% 2x - sharpen - place to bottom - ds
Open tube - resize to liking - Xero - radiance - beauty to 70 - hit ok
Open 4 - resize by 50% - place to bottom right - ds
On background layer
Click on background with magic wand - new layer
Open paper7 - c/p into selection - deselect
Layers - New mask layer - From Image
Find your mask in source window - hit ok
Merge group
Resize mask by 75% - duplicate mask - change blend to screen
Duplicate mask again
Open 30 - c/p as a new layer
Open 13 - place to the bottom
Delete background layer - merge visible
Add credits and name
Tuesday, June 10, 2014

*click on image to view full size*
PTU I'm at the Beach
This tutorial was written by me on June 10, 2014.
It was made out of my own creation and any similarity is purely coincidental.
I used pspx6 but any version should work without problems.
If you're doing this tutorial you must have good psp knowledge and be familiar with the tools.
Let's get started!
Artist: Idyll by Trinita
Scrapkit: On the Beach by Scrappin Krazy Designs
Mask: DBV 106
Font: TheNautiGal
*open your mask and minimize in your workspace*
c/p = copy and paste, ds = drop shadow
File - New - 700x700 - flood fill w white
Click on background with magic wand - new layer
Open paper14 - c/p into selection - deselect
Layers - New mask layer - From Image
Find your mask in source window - hit ok
Merge group
Open 59 - resize by 75% - move down
Open 23 - resize by 50% - sharpen - place to the right - ds
Open 18 - resize by 50% - sharpen - place to left - ds
Open 5 - resize by 75% - sharpen - place to bottom - ds
Open 14 - resize by 50% 2x - sharpen - place to the top - ds
Open 34 - place to the bottom
Open 13 - resize by 50% 2x - sharpen - place to the right - ds
duplicate - mirror - move to the center some
Open 33 - resize by 50% - sharpen - place to the bottom - ds
Open 21 - resize by 50% 2x - sharpen - place to the left - ds
Open 44 - resize by 50% 2x - sharpen - place to the bottom - ds
Open 42 - resize by 50% 2x - sharpen - place to the bottom - ds
Open 7 - place to the right - ds
Open 4 - resize by 50% - sharpen - place to right - ds
Open 37 - resize by 50% 2x - sharpen - place to the right - ds
Open 60 - resize by 50% 2x - sharpen - place to the right - ds
Open tube - resize to your liking - place to right some
Xero - porcelain - change blue channel to 0 - hit ok
Add drop shadow to your tube
Open 32 - resize by 50% 2x - sharpen - place to the bottom right - ds
Delete background - merge visible
Adjust - Brightness and Contrast
Local Tone Mapping - strength 5.0 - Block Size 15 - hit ok
Add credits and name
Saturday, May 24, 2014

*click on image to view full size*
PTU Sexy Pirate
This tutorial was written by me on May 24, 2014.
It was made out of my own creation and any similarity is purely coincidental.
I used pspx5 but any version should work without problems.
If you're doing this tutorial you must have good psp knowledge and be familiar with the tools.
Let's get started!
Artist: Angelia by Di Halim
Scrapkit: Pirate's Ahoy by Scrappin Krazy Designs
Mask: 19 by moonbeams and spiderwebs
Font: Remachine Script
*open your mask and minimize in your workspace*
c/p = copy and paste, ds = drop shadow
File - New - 700x700 - flood fill w white
Open 3 - resize by 50% - free rotate to the right by 23 degrees
Open tube - place under frame so face is towards the left of it
Click inside your frame w magic wand - expand by 5 - new layer
Open paper1 - c/p into selection
Move paper under tube layer
On tube layer - invert - delete - deselect
Xero - radiance - change beauty to 167 - hit ok - ds
On frame layer - apply Lokas 3D Shadow
Blur: 25 Transparency: 70
Angle X: 0 Angle Y: 0 Angle Z: 0
Zoom: 100 Offset X: 5 Offset Y: 5
Perspective: 40 Color: Black
Hit Okay
Open 10 - resize by 50% - sharpen - place to bottom left - ds
Open 45 - resize by 50% 2x - sharpen - bottom left - ds
Open 46 - resize by 50% 2x - sharpen - bottom - ds
Open 14 - resize by 50% - place to the left - ds
Open 6 - resize by 50% - sharpen - place to bottom right - ds
Open tube - resize to your liking - place to the right
Xero - radiance - w same settings as above - hit ok - ds
On background layer
Click on background with magic wand - new layer
Open paper9 - c/p into selection - deselect
Layers - New mask layer - From Image
Find your mask in source window - hit ok
Merge group
Open 39 - place to the bottom
Open 26 - resize by 75% - place to top left - ds
Open 17 - place to the top - ds
Open 42 - place to bottom right - ds
Open 9 - resize by 50% - sharpen - place to left - ds
Open 48 - resize by 50% 2x - sharpen - place to top left - ds
Delete background layer - merge visible
Crop tag to your liking
Add credits and Name
Tuesday, April 29, 2014
*click on image to view full size*
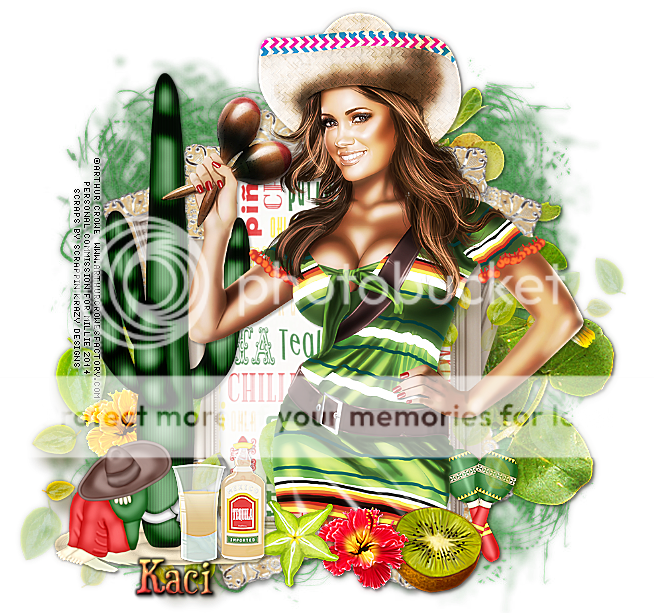
PTU Time for the Fiesta
This tutorial was written by me on April 29, 2014.
It was made out of my own creation and any similarity is purely coincidental.
I used pspx5 but any version should work without problems.
If you're doing this tutorial you must have good psp knowledge and be familiar with the tools.
Let's get started!
Artist: Hot Tamale by Arthur Crowe
Scrapkit: Viva la Fiesta by Scrappin Krazy Designs
Plugins: Lokas 3D Shadow and Xero Radiance
Mask: 41 by me HERE
Font: Duality
*open your mask and minimize in your workspace*
c/p = copy and paste, ds = drop shadow
File - New - 700x700 - flood fill w white
Open 51 - resize by 70% - sharpen
Image - free rotate - left by 90 degrees - hit ok
Click inside your frame w magic wand - expand by 5 - new layer
Open paper10 - c/p into selection - deselect
Move paper under frame
On frame apply Lokas - 3D Drop shadow w following settings:
Blur: 25 Transparency: 70
Angle X: 0 Angle Y: 0 Angle Z: 0
Zoom: 100 Offset X: 5 Offset Y: 5
Perspective: 40 Color: Black
Hit Okay
Duplicate your frame and place under paper
rotate to the right by 18 degrees
duplicate again - mirror - move left a little
Close background layer - merge visible - open background layer
On merged layer
Open 24 - resize by 50% 2x - sharpen - place to the bottom right - ds
Open 56 - place to the bottom - ds
Open 42 - resize by 50% 2x - sharpen - place to left - ds
Open 22 - place to the left - ds
Open half tube - resize to fit your tag and place to the right some
Apply Xero - radiance and change beauty to 158 - hit ok - ds on tube
Open 46 - resize by 50% 2x - sharpen - place to bottom right - ds
Open 44 - resize by 50% 2x - sharpen - place to bottom and right some - ds
Open 43 - resize by 50% 2x - sharpen - place to bottom - ds
Open 25 - resize by 50% 2x - sharpen - place to bottom left - ds
Open 18 - resize by 50% 2x - sharpen - place to bottom left - ds
Open 17 - resize by 50% 2x - sharpen - place to bottom left - ds
On background layer
Click on background with magic wand - new layer
Open paper16 - c/p into selection - deselect
Layers - New mask layer - From Image
Find your mask in source window - hit ok
Merge group
Open 60 - place to the right - ds
Delete background - merge visible
Add credits and name
Thursday, April 17, 2014

*click on image to view full size*
PTU I'll Give You That Bunny Luv
This tutorial was written by me on April 17, 2014.
It was made out of my own creation and any similarity is purely coincidental.
I used pspx6 but any version should work without problems.
If you're doing this tutorial you must have good psp knowledge and be familiar with the tools.
Let's get started!
Artist: Bunny by Di_Halim
Scrapkit: Bunny Luv by Scrappin Krazy Designs
Mask: 40 by me HERE
Font: Perpetua Tiling MT
*open your mask and minimize in your workspace*
File - New - 700x700 - flood fill w white
Click on background with magic wand - new layer
Open paper2 - c/p into selection - deselect
Layers - New mask layer - From Image
Find your mask in source window - hit ok
Merge group
Open 68 - c/p as new layer
Open tube close up - resize by 50% - place face inside of frame
Click inside your frame w magic wand - expand by 5 - new layer
Open paper1 - c/p into selection
Move paper under frame
On tube close-up - xero - radiance - hit ok
invert - delete - deselect - change opacity to 50
On frame apply Lokas 3D shadow w these settings:
Blur: 25 Transparency: 70
Angle X: 0 Angle Y: 0 Angle Z: 0
Zoom: 100 Offset X: 5 Offset Y: 5
Perspective: 40 Color: Black
Hit Okay
Apply Lokas 3D Shadow again
Open 67 - resize by 50% - place to the right - drop shadow
Open 17 - resize by 50% 2x - sharpen - place to the right - drop shadow
Open 51 - resize by 50% 2x - sharpen - place to bottom right - drop shadow
Open 44 - resize by 50% 2x - sharpen - place to bottom - drop shadow
Open 38 - resize by 50% - sharpen - place to bottom left - drop shadow
Open 23 - resize by 50% 2x - sharpen - place to bottom left - drop shadow
Open tube - resize to fit tag - place to right
Xero - porcelain default settings - hit ok
Drop shadow on tube
Open 9 - resize by 50% 2x - sharpen - place to bottom left - drop shadow
Open 14 - resize by 50% 2x - sharpen - place to bottom - drop shadow
Delete background - merge visible - crop your tag
Add credits and name
Tuesday, March 25, 2014
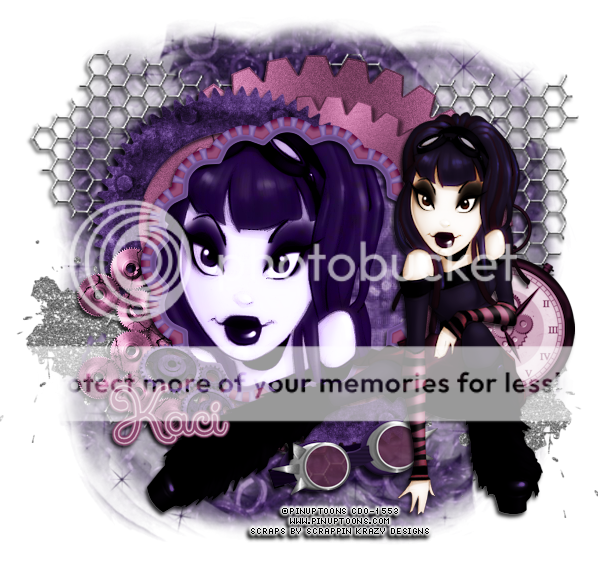
*click on image to view full size*
PTU Steampunk Dreams
This tutorial was written by me on March 25, 2014.
It was made out of my own creation and any similarity is purely coincidental.
I used pspx5 but any version should work without problems.
If you're doing this tutorial you must have good psp knowledge and be familiar with the tools.
Let's get started!
Artist: Pinuptoons
Scrapkit: Lavender Steampunk by Scrappin Krazy Designs
Mask: 147 by DBV
Font: Xiomara
*open your mask and minimize in your workspace*
File - New - 700x700 - flood fill w white
Click on background with magic wand - new layer
Open paper13 - c/p into selection - deselect
Layers - New mask layer - From Image
Find your mask in source window - hit ok
Merge group
Resize mask by 75%
Open 60 - place to bottom right
Duplicate - place to left and up some
Open 59 - c/p as new layer - drop shadow
Open 6 - place to right some - drop shadow
Open 19 - resize by 50% - sharpen - place to right - drop shadow
Open 5 - place to the left some - drop shadow
Open 17 - place to bottom left - resize by 50% - sharpen - drop shadow
Open 61 - resize by 50% - c/p as new layer
Open paper12 - c/p as new layer - move under frame
Open tube close up - c/p as new layer
Place face so its inside frame
Click on frame w magic wand - expand by 10
On tube layer - invert - delete - invert
Xero - radiance - default settings
On paper settings - invert - delete - deselect
Add drop shadow to the frame
Open 35 - resize by 50% - place to bottom right - drop shadow
Open 16 - resize by 50% 2x - sharpen - place to bottom left - drop shadow
Open full tube - resize by 80% - place to right some
Xero - radiance - default settings - hit ok
Drop shadow to your tube
Crop your tag to your liking
Delete background layer - merge visible
Add credits and name
Friday, March 21, 2014

*click on image to view full size*
PTU Let's Get This Party Started
This tutorial was written by me on March 21, 2014.
It was made out of my own creation and any similarity is purely coincidental.
I used pspx5 but any version should work without problems.
If you're doing this tutorial you must have good psp knowledge and be familiar with the tools.
Let's get started!
Artist: Beautiful Strawberry Toon by Arthur Crowe
Scrapkit: Kiss This by Scrappin Krazy Designs
Mask: Vix Mask 382
Plugin: Xero - Porcelain
Font: Immpervious
*open your mask and minimize in your workspace*
File - New - 800x800 - flood fill w white
Open 52 - resize by 75% - sharpen - c/p as new layer
Click inside your frame w magic wand - expand by 5 - new layer
Open paper5 - c/p into selection - deselect
Move paper under frame
Add drop shadow to your frame
Open 59 - resize by 70% - sharpen - rotate and add drop shadow
Open 58 - resize by 50% - sharpen - place to top left - drop shadow
Open 60 - resize by 75% - place to bottom left - drop shadow
Open tube - resize to fit your tag - place to the right
Xero - porcelain - change blue channel to 0 - hit ok
Drop shadow tube
Open 45 - c/p as new layer
On background layer
Click on background with magic wand - new layer
Open paper3 - c/p into selection - deselect
Layers - New mask layer - From Image
Find your mask in source window - hit ok
Merge group
Move mask to left and up - duplicate and place bottom right
Open 65 - resize by 80% - sharpen - place to the left and rotate left
Duplicate - mirror - flip - add drop shadow to both
Open 66 - place to the bottom - drop shadow
Delete background - merge visible - crop your tag
Add credits and name
Sunday, February 16, 2014
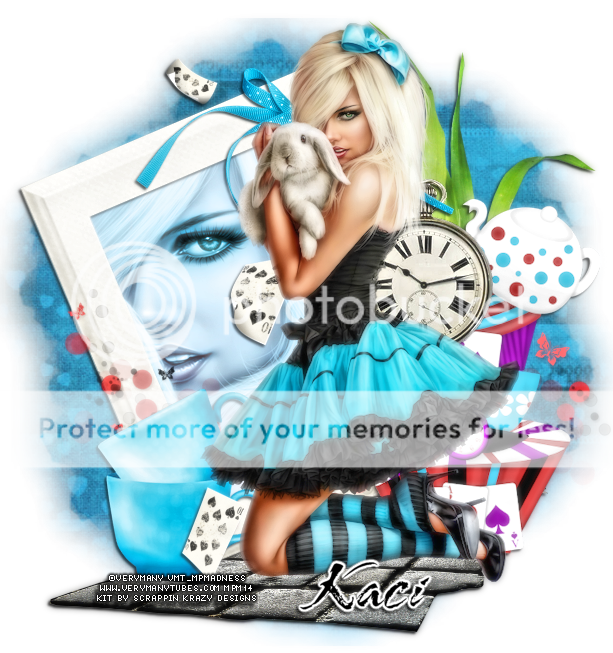
PTU It's Me Alice
This tutorial was written by me on February 16, 2014.
It was made out of my own creation and any similarity is purely coincidental.
I used pspx6 but any version should work without problems.
If you're doing this tutorial you must have good psp knowledge and be familiar with the tools.
Let's get started!
Artist: Alice by Verymany
Scrapkit: Wonderland by Scrappin' Krazy Designs
Mask: any mask of choice
Font: Arid ITC
Plugin: Xero - Porcelain
*open your mask and minimize in your workspace*
File - New - 700x700 - flood fill w black
Open 71 - resize by 80% - c/p as new layer
Image - free rotate - to the left by 23 degrees - hit ok
Open tube close up - place under frame
Click inside frame w magic wand - expand by 10 - new layer
Open pp24 - c/p into selection - move paper under tube
On tube layer - invert - delete - deselect
Change tube blend mode to luminance (L) - duplicate tube
Change blend mode to screen - opacity to 65
Add drop shadow to frame
Open 74 - place to the bottom
Open 67 - resize by 50% - place to bottom left
Open 123 - resize by 80% - place to the right - drop shadow
Open 108 - resize by 50% - place to the right - drop shadow
Open 86 - place to top - drop shadow
Open 60 - move to right some - drop shadow
Open full tube - c/p as new layer - move to right a little bit
Xero - porcelain - change blue channel to 0 - hit ok
On background layer
Click on background with magic wand - new layer
Open paper20 - c/p into selection - deselect
Layers - New mask layer - From Image
Find your mask in source window - hit ok
Merge group
Open 93 - place to bottom - drop shadow
Open 58 - place to right - drop shadow
Delete background - merge visible
Adjust - Brightness and Contrast
Local Tone Mapping - strength 4.0 - Block Size 35 - hit ok
Add credits and name
Saturday, January 25, 2014
*click on image to view full size*
PTU Time for Seduction
This tutorial was written by me on January 25, 2014.
It was made out of my own creation and any similarity is purely coincidental.
I used pspx5 but any version should work without problems.
If you're doing this tutorial you must have good psp knowledge and be familiar with the tools.
Let's get started!
Artist: Ismael Rac
Scrapkit: Love is Red by Scrappin' Krazy Designs
Plugins: Xero - radiance
Font: Carlotta
*open your mask and minimize in your workspace*
File - New - 700x700 - flood fill w white
Opne 51 - resize by 85% - drop shadow
Open 58 - place to top right - drop shadow
Open 49 bottom left - duplicate - mirror - place to top - merge down
Add drop shadow
Open 16 - place to the bottom
Open 89 - resize by 85%
Open tube close up - place under 89
Click inside 89 w magic wand - expand by 5 - new layer
Open pp8 - c/p into selection - move under tube close up - deselect
On tube layer - xero - radiance - hit ok
Change blend mode to luminance (L)
Add drop shadow to 89 - duplicate - sharpen
Open 45 - place to the right - drop shadow
Open 2 - resize by 50% - sharpen - place to bottom left - drop shadow
Open tube resize and place to liking
Open 85 - place to the right - drop shadow
Open 73 - place to the bottom - drop shadow
Open 82 - place to bottom - drop shadow
Open 76 - place to the bottom
Open 70 - resize by 50% - sharpen - place to right - drop shadow
Open 87 - resize by 50% - place to bottom left - drop shadow
Delete background - merge visible
Adjust - Brightness and Contrast
Local Tone Mapping - strength 4.0 - Block Size 35 - hit ok
Add credits and name
Thursday, January 16, 2014
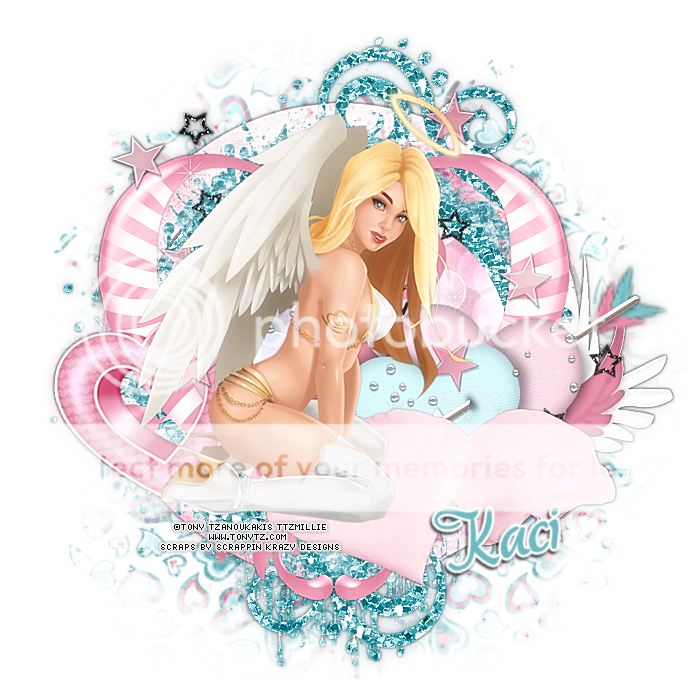
PTU So Angelic
This tutorial was written by me on January 16, 2014.
It was made out of my own creation and any similarity is purely coincidental.
I used pspx5 but any version should work without problems.
If you're doing this tutorial you must have good psp knowledge and be familiar with the tools.
Let's get started!
Artist: Golden Angel by Tony Tzanoukakis
Scrapkit: Natalie by Scrappin Krazy Designs
Mask: 20 from moonbeams and spiderwebs
Font: akaDora
*open your mask and minimize in your workspace*
File - New - 700x700 - flood fill w white
Click on background with magic wand - new layer
Open paper7 - c/p into selection - deselect
Layers - New mask layer - From Image
Find your mask in source window - hit ok
Merge group
Open 59 - resize by 75%
Click inside frame w magic wand - expand by 5 - new layer
Open pp2 - c/p into selection - move under frame - deselect
Add drop shadow to frame
Open 38 - c/p as new layer
Open 51 - place to right - dup mirror - merge down - add drop shadow
Open 7 - resize by 50% - place to bottom left - drop shadow
Open 6 - place to the right - drop shadow
Open 67 - drop shadow
Open 75 - bottom right - drop shadow
Open tube - resize to fit your tag and place to your liking
Delete background layer - merge visible
Duplicate - change blend to screen - opacity 50 - merge down
Adjust - sharpen - sharpen more
Add credits and name
Thursday, January 9, 2014

*click on image to view full size*
PTU Very Sexy Girl
This tutorial was written by me on January 9, 2014.
It was made out of my own creation and any similarity is purely coincidental.
I used pspx5 but any version should work without problems.
If you're doing this tutorial you must have good psp knowledge and be familiar with the tools.
Let's get started!
Artist: Jose cano
Scrapkit: Glitter by Scrappin Krazy Designs
Font: Carlotta
*open your mask and minimize in your workspace*
File - New - 700x700 - flood fill w white
Open frame 1 - c/p as new layer
Open tube close up - place under frame and move to left
Duplicate - mirror and move down some - merge down
Click inside frame on both sides - expand by 5 - new layer
Open paper of choice - paste into selection - move under tube layer
On tube layer - invert - delete - deselect
Change blend layer to Luminance (L) and opacity to 75 - duplicate
Change blend to screen and opacity to 100
Add drop shadow to your frame
Open star - resize by 50% - place to bottom left - add drop shadow
Duplicate - mirror - move down some
With "Impact" font - size 72pt - anti-atlas to smooth - color of choice
Write the following: very sexy girl
Eye candy - gradient glow w these settings:
(Basic) glow width 3 - soft corners 25 - overall opacity 100
draw only outside selection checked
(Color) Fat - hit ok
Place the wordart to the bottom - add drop shadow
On background layer
Open doodle 1 - place to bottom left - add drop shadow
Duplicate - mirror and flip
Open diamonds - place to the right - duplicate - mirror - merge down
Add drop shadow
Open wire - add drop shadow
Open discoball - add drop shadow
Open flower 4 - place to left and up - drop shadow
Duplicate - mirror - place down some
Delete background layer - merge visible
Adjust - sharpen - sharpen more
Add credits and name
Saturday, December 28, 2013

*click on image to view full size*
PTU Happy New Year To You
This tutorial was written by me on December 28, 2013.
It was made out of my own creation and any similarity is purely coincidental.
I used pspx5 but any version should work without problems.
If you're doing this tutorial you must have good psp knowledge and be familiar with the tools.
Let's get started!
Artist: Sheila by Di Halim
Scrapkit: 321 New Year by Scrappin Krazy Designs
Mask: Halftone 8 by Dangerously Deliciously Designs
Plugins: Xero radiance and porcelain
Font: Plaster of Paris
*open your mask and minimize in your workspace*
File - New - 700x700 - flood fill w white
Open frame (ele 15) resize by 80%
Open tube close up - c/p as new layer - place so face is inside frame
Click inside frame w magic wand - expand by 5 - new layer
Open pp12 - c/p into selection - move paper under tube close up
On tube layer - selections - invert - delete - deselect
Xero - Radiance - hit ok
Change blend mode to screen - opacity to 57 - duplicate tube
On duplicate - adjust - blur - gaussian blur - 3 hit ok
Change layer opacity to 100
Add drop shadow to your frame
Open 36 - resize by 50% - place to bottom right
Open 38 - place to left - duplicate - place to right - merge down - drop shadow
Open 54 - resize by 50% - place to bottom right - rotate to right w deform tool
Add drop shadow
Open 33 - place to bottom left
Open full tube - resize by 50% - place to the bottom
Xero - porcelain - change blue channel to 0 - hit ok
Add drop shadow to your tube
On background layer
Click on background with magic wand - new layer
Open paper of choice - c/p into selection - deselect
Layers - New mask layer - From Image
Find your mask in source window - hit ok
Merge group
Open 32 - move to left some
Open 30 - place to the bottom
Delete background layer - merge visible
I cropped my tag some
Add credits and name

Wednesday, December 18, 2013

*click on image to view full size*
PTU Hey There Santa
This tutorial was written by me on December 18, 2013.
It was made out of my own creation and any similarity is purely coincidental.
I used pspx5 but any version should work without problems.
If you're doing this tutorial you must have good psp knowledge and be familiar with the tools.
Let's get started!
Artist: Natasha by Roman Zaric
Scrapkit: Oh Santa by Scrappin' Krazy Designs
Mask: dvb mask 111 HERE
Plugin: Xero - porcelain
Font: Rage Italic
*open your mask and minimize in your workspace*
File - New - 700x700 - flood fill w white
Open 70 - c/p as new layer - move to bottom and left some
Click inside your frame w magic wand - expand by 5 - new layer
Open paper1 - c/p into selection - deselect
Move paper under frame
Add drop shadow to your frame
Open 50 - resize by 50% - place to top left - add drop shadow
Open 06 - resize by 50% - place to left - rotate to right some w deform tool
add drop shadow
Open 01 - resize by 50% - place to bottom left - add drop shadow
Open 65 - resize by 50% - place to bottom left - add drop shadow
Open 68 - place to right - add drop shadow
Open 56 - place to bottom right - add drop shadow
Open 24 - resize by 50% 2x - place to bottom right - add drop shadow
Open tube - resize to your liking
Xero - porcelain - change blue channel to 0 - hit ok
Click on background with magic wand - new layer
Open paper16 - c/p into selection - deselect
Layers - New mask layer - From Image
Find your mask in source window - hit ok
Merge group - resize your mask to fit your tag
Delete background - merge visible
Add credits and name
Subscribe to:
Posts
(Atom)


