


Sunday, December 9, 2012
*click on image to view full size*
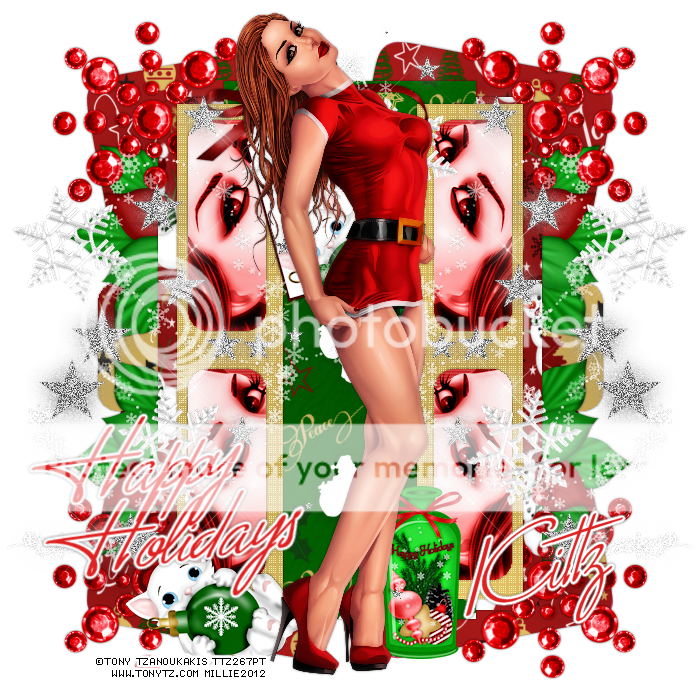
FTU Happy Holidays
This tutorial was written by me on Dec 9, 2012
It was made out of my own creation and any similarity is purely coincidental.
I used pspx2 but any version should work without problems.
Let's get started!
Artist: Tony Tzanoukakis
Scrapkit: Ho Ho Ho and Away by Kittz Kreationz
Template: 147 by me HERE
Plugins: penta - dot and cross, xero porcelain and radiance, eyecandy - gradient glow
Font: I used Monika
*light drop shadow all throughout* or any of your liking
Open template, duplicate, close original
Delete cr layer and make your background visible
Open your tube, go to layer 11, c/p as new layer
resize your tube to fit your tag
You can close your tube layer and we'll go back to it
Go to layer 4, merge down to 3, then to 2, then to 1
Selections, all, float, defloat, new layer
selections - modify - smooth - settings: amount 20, corner scale 10
anti-atlas adn preserve corners checked, hit ok
Open paper 2, c/p into selection, deselect
Go to layer 5, select all, float, defloat, open paper1, c/p as new layer, invert, delete
Open HHA-2, c/p as new layer, move to the left, duplicate, mirror, merge down
Duplicate, flip, merge down
Merge layer 7 down to 6, selections all, float, defloat, new layer
Open paper 4, c/p into selection, selections - none
Go to layer 8, selections all, float, defloat, open pp3, c/p as new layer, invert, delete
Selections - none
Open HHA-27, c/p as new layer, place to the left, duplicate, mirror, merge down
Duplicate, flip, merge down
On layer 9, selections all, float, defloat, new layer
Flood fill new layer with #d1b05e, or any color from the tag
penta - dot and cross default settings, deselect
Go to layer 10, c/p your tube as new layer, place to the left
Once face of tube is in left side of layer 10 use magic wand to click on rectangle
On tube layer, invert, delete, invert
On layer 10, new layer, flood fill w red from tag, effects blinds, width3, opacity 20, color white
On tube, effects - xero - radiance, default, change blend to luminance (L)
Merge tube down to red layer, duplicate, mirror, merge down
Duplicate, place above layer 11, place duplicate on top of layer 11
Open ho ho and away, happy holidays bottle, resize by 50%, sharpen, c/p as new layer
Place to the right
Open HHA-38, c/p as new layer, place to the left, duplicate, mirror
Open HHA-44, c/p as new layer, resize by 50%, place in to middle of tag
Open HHA-41, c/p as new layer, resize by 50%, place in left bottom of tag
Make tube layer that you closed up at the beginning visible, it should be the very top layer
xero - porcelain, change blue channel to 0, duplicate tube, change blend to soft light
delete background layer, merge visible
With Monako font, 72pt and red from the tag on your background write Happy Holidays
Effects - Eyecandy - gradient glow, glow width 3, fat hit ok
Merge down, add your credits and your name
Subscribe to:
Post Comments
(Atom)


0 comments:
Post a Comment